4 Quick And Easy Steps To Create Home Walk-Through Video
According to the National Association of Realtors (NAR), house walk-through videos generate 157% more organic search results for your online listings. Furthermore, real estate listings with videos have been found to generate 403% more inquiries than those without videos.
The home walkthrough videos hold the power to attract potential buyers far more effectively than static images alone, ultimately resulting in increased showings and offers. In today’s post, we will help you understand their importance and several easy and quick steps to create effective editing videos.
1. How Effective Is Including The Walk-Through Video in Your Home Listing?
When listing your home, expand your reach to potential buyers. Including a walk-through video in your listing can significantly increase buyer engagement, particularly among millennials who increasingly rely on online listings. Video walkthroughs become essential, especially in areas attracting out-of-state buyers, like vacation spots, aiding in their decision-making process and saving on travel expenses.
Regarding the outstanding statistics of National Association of Realtors, 83% of Millennials and 94% of Gen Zs would opt for agents providing more immersive listings. 46% of homebuyers find 3D virtual tours to be very useful. Besides, where the purchasers found the ideal home is from the Internet reaching 52%. Matterport surveyed approximately 80% of participants expressed willingness to change to a real estate agent who provides immersive 3D tours for the properties they list.
2. How to Create a Home Walk-Through Video with 4 Basic Steps
Step 1: Preparing and Setuping for Walk-Through Video
- Why We Need to Choose The Right Equipment Gears?
Creating a quality home walkthrough video doesn’t always require special or expensive equipment. While smartphones now boast quality cameras and advanced features, additional tools can enhance the recording process. Consider utilizing the following equipment if readily available:
- DSLR camera
- Wide-angle zoom lens (16–35mm) / 17–40mm
- Tripod with a slider
- Second tripod head for slider
- Drone (if available)
Using a tripod for stability and improved footage quality also needs to pay more attention in your 3D walkthrough video. Since tripods are cost-effective and compatible with smartphones, setting up your camera involves several key considerations:
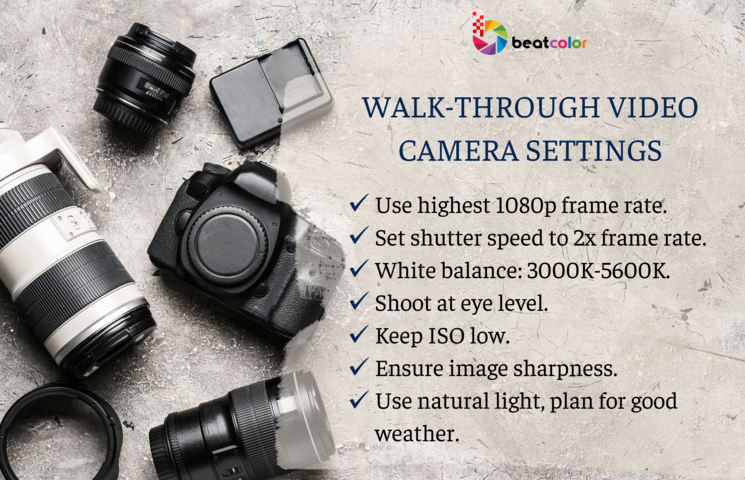
- Opt for the highest frame rate possible in 1080p resolution.
- Adjust shutter speed to at least 2x the frame rate (1/50 or 1/100) to prevent flickering.
- Set white balance between 3000K and 5600K.
- Shoot at eye level when feasible.
- Maintain a low ISO for optimal image quality.
- Ensure the sharpness of the image.
- Utilize natural light for both interior and exterior shots, scheduling shoots around favorable weather conditions.
Partly cloudy days typically yield the best results, while very cloudy days may warrant rescheduling to avoid compromised footage quality.
- Is The Property Setup Vital In The Home Walkthrough Video?
With preparing the recording equipment, ensuring a tidy and clean space becomes the focal point to elevate the visual appeal of the house, making it captivating and eye-catching. Consider the following factors when getting ready for the shoot:
- Ensure the home is clean, tidy, and well-organized.
- Remove personal items like homeowner photographs.
- Declutter all surfaces, including counters, tabletops, and shelves.
- Remove pets from the premises.
- Ensure cabinet and closet doors are closed.
- Smooth out wrinkles on bedspreads.
- Close toilet seats and shower curtains.
- Arrange throw pillows, window treatments, artwork, plants, etc.
The more thorough and careful the preparation is, the smoother your shoots are.
Step 2: Shooting the 3D Walkthrough Video
- The shoot list
The significance of planning should not be underestimated. Make sure to carefully map out the areas you want to highlight in your video. Consider your audience’s preferences during this phase and adjust the video accordingly to better connect with them.
Here’s a fundamental shot list to keep in mind for any shoot:
Indoor shots:
- Main entrance
- Living room, great room, and family room
- Kitchen, including appliances, countertops, and cabinets
- Dining room or dining area
- Each bedroom and bathroom
- Highlight home amenities like fireplaces, whirlpool tubs, window seats, and spacious closets
Outdoor shots:
- Approach from the street to the door
- Door opening
- Various angles of the home’s exterior
- Showcase backyard features like pools, gardens, decks, and seating areas
- For significant rooms such as the kitchen, living room, or master suite, ensure capturing multiple shots and camera angles to provide a comprehensive view for potential buyers.
Incorporating footage of the surrounding areas offers insight into the neighborhood lifestyle. Highlight nearby parks, downtown areas, business districts, and other community amenities to paint a vivid picture of the living environment.
- During shooting
Quality that your home video walkthrough maintains a professional appearance and is in high-definition (HD) quality.
Smooth and steady footage is key, avoiding any shaking or sudden movements. Utilizing slides and glides facilitates this process.
Slides aid in achieving steady camera movement from front to back. A crucial tip is to ensure the slider remains unseen in the shot.
Here’s how to use glides and slides effectively:
- Begin with the slider positioned just outside a doorway to introduce the room.
- Utilize sliding and panning techniques to create a wrap-around effect.
- In the absence of a slider, pans, and tilts can also be employed for detailed shots of various spaces, highlighting features such as hardwood floors, tile, or countertops.
Step 3: Basic Editing
Once you have captured the footage, it’s time to dive into basic editing techniques to refine the video. Begin by cutting and merging clips to create a seamless walk-through experience. Remove any unnecessary footage or transitions that disrupt the flow of the video, keeping the viewer engaged from start to finish
Additionally, adjust lighting and colors to enhance image quality. Use editing software to correct any overexposed or underexposed areas, ensuring consistent brightness and contrast throughout the video. By fine-tuning these elements, you can create a visually appealing walk-through that highlights the property’s best features.
To elevate your 3d walkthrough video animation, consider adding effects and music to enhance the viewer’s experience. Use transition effects between clips to create smooth transitions and add visual interest. Experiment with different effects such as fades, wipes, or zooms to keep the video dynamic and engaging.
Furthermore, selecting appropriate background music can create a comfortable and appealing atmosphere for viewers. Choose music that complements the mood and style of the property, whether it’s upbeat and energetic or calm and relaxing. Avoid using copyrighted music without permission to prevent legal issues and opt for royalty-free music options instead.
To identify any areas needing improvement and ensure clarity in instruction, a good way is to get feedback from your colleagues or friends. If you do not have much time, you can reference a trusted editing company like BeatColor to have them edit more professionally and quickly.
Step 4: Review and Publishing
Before publishing your walk-through video, take the time to review it thoroughly and make any necessary adjustments. Watch the video from beginning to end, and pay attention to details such as audio quality, pacing, and visual consistency. Make any final edits or tweaks to ensure the video meets your standards of quality.
Once you’re satisfied with the final product, it’s time to publish the video and share it with your audience. Upload the video to your website or video hosting platform and promote it on social media platforms such as Facebook, Instagram, or YouTube. Encourage viewers to like, comment, and share the video to expand its reach and attract potential buyers.
Final thoughts
In summary, creating the walk-through videos involves careful planning, filming, and editing techniques. By following these four quick and easy steps – preparation and filming, basic editing, adding effects and music, and reviewing and publishing – you can produce impressive walk-through videos that effectively showcase your real estate properties.
Apply these steps to your projects and experiment with different techniques to create captivating walk-through videos. With the right tools and techniques, you can elevate your real estate marketing efforts and attract more potential buyers to your properties. When you find them too difficult or do not have enough time, Beatcolor will make your expectations come true.
Related post:
Is Real Estate AI-Powered Photo Editing Too Good To Be True?
Unveil Emerging Real Estate Trends for 2024
Real Estate Photo Editing Trends in 2024 – Experts’ Assessment


