Bracketing Real Estate & Advanced Technique For Photographing Interior
Bracketing real estate becomes very popular with real estate photographers thanks to its covering a wide dynamic range of exposures. More than introducing bracketing real estate photography, this concise post gives you techniques of applying bracketing real estate to photograph the interior. Let’s get started!
What Is Bracketing Real Estate?
In an easy-to-understand way, bracketing real estate is the technique to shoot multiple shoots at the same aperture but different shutter speeds. This setting is aimed at covering a wider dynamic range of exposures such as overexposed, underexposed, and correctly exposed photos. Then, they are merged together to produce captivating images featuring enough details in both highlights and shadows.
The use of blending bracketing real estate is to perfectly showcase and make it more inviting. Commonly, real estate photographers shoot 5 exposures under the shutter speed of -2, -1, 0, +1,+2 Or 3 exposures: -2, 0, +2. 0 presents the correctly exposed photo, which is also the frame you will get if shooting in an automatic or aperture priority mode.
The darker exposures like -2, and -1 come in handy to get details that are usually blown out in the brighter shots like +1, and +2. Similarly, the overexposed shots +1, and +2 perfectly remain well-lit shadows.

Types of Bracketing Real Estate
Automatic Exposure Bracketing
As the name suggests, DSLR camera automatically takes multiple exposures around a central shutter speed. Commonly, it is a bracketing of 3 exposures.
Under AEB mode, the camera automatically captures one properly exposed photo then one other shot on either side according to its metering. This method creates a series of 3 images with the same composition and different exposures.
Semi-Automated Method
Semi-automatic exposure mode gives you more control over ISO, Aperture, and Shutter. You can set either ISO and aperture, or ISO and shutter. According to your inputs & camera metering, the camera sets either the shutter speed or aperture.
Full Manual Method
In the contrast to two above modes, you will set the aperture, shutter, and ISO. manual method. Normally, you will apply the same aperture and ISO for the same series and then manually alter shutter speed for each exposure. Let’s input the fastest shutter speed to take the first shot. Then, decrease the shutter speed by one stop or 1 EV for the next shot. You continue shooting until the final exposure is taken with the lowest shutter speed.
What Is The Difference Between AEB And HDR?
Although AEB and HDR are the camera’s automatic features, the major difference between AEB and HDR is that under HDR mode, the camera still captures some shots at different exposure levels. Then, the camera’s algorithm will automatically blend all images together to produce the final HDR image.
From the principle of HDR photography, it is easy to recognize that HDR constantly produces a composite image for preview. The hardest parts are already performed by the camera so normally, there is no need for post-production. However, the outputs of HDR photography are quite lower in comparison to manually editing AEB.
Another distinct feature of HDR photography is that bracketing real estate goes away right after its composite shot created. Due to that fact, there is no way other than reshoot if you are not happy with the image quality.
How to Photograph Real Estate Interiors Using Exposure Bracketing
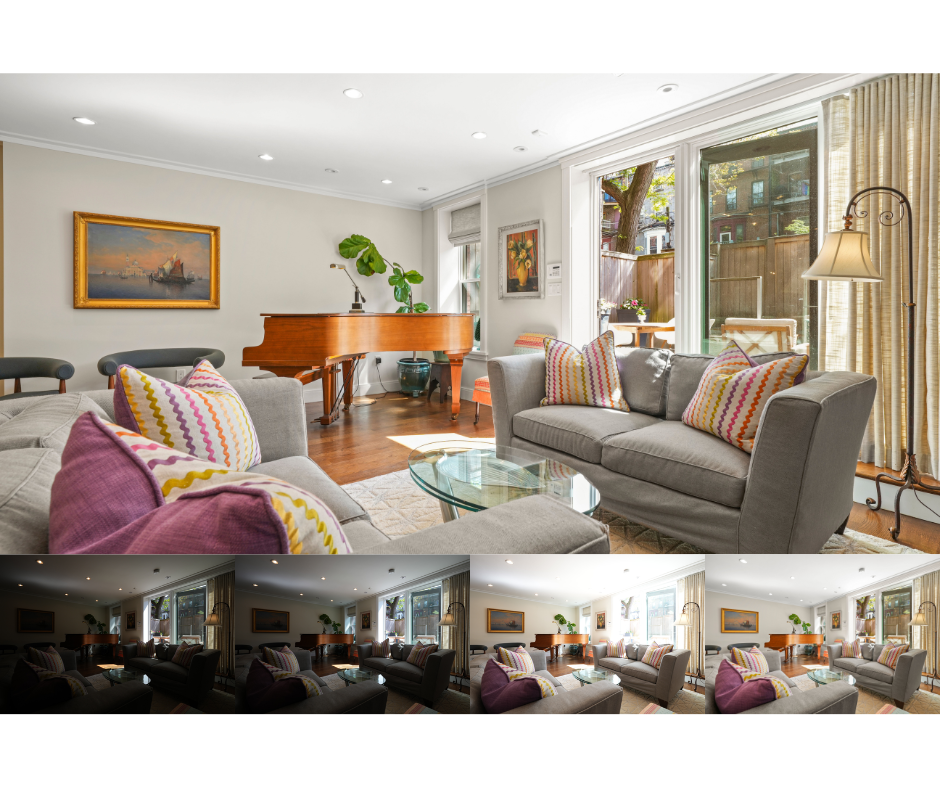
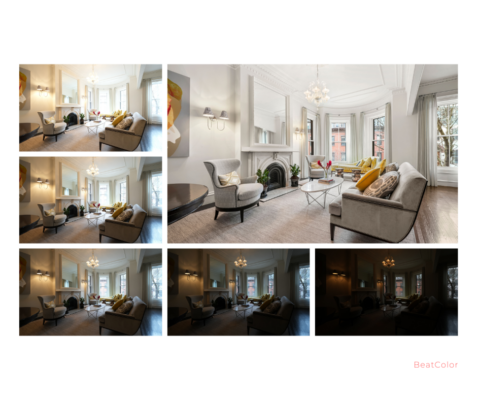
Interior real estate photography has a wide variety of light conditions. Bracketing real estate is the terrific solution to contain enough details in the shadow and highlight areas, which a single shot can not get.
More specifically, taking a bright room flooded by the natural light usually leads to the blowout window with the white sky and a dark foreground in the background. Capturing exposure bracketing varying from shutter speed is the most fundamental to real estate photo editing. The manually blending in the post-production creates realistic images like you are in that room.
Now, let’s us get you through the process of how to photograph real estate interiors using exposure bracketing.
Step 1: Follow Real Estate Camera Settings
- Remain the same ISO and Aperture throughout the shots
- Use ISO 320 & f/8.0
Step 2: Open the Menu Settings & Alter the settings to Aperture priority mode
Step 3: Use Spot Metering Mode and position the focus point over the darkest part of the scene and note the shutter speed.
Step 4: Similarly, point it to the brightest area of the frame (avoiding sun reflections and bare light bulbs) then read shutter speed.
Step 5: Input the shutter speeds on HDR Exposure Calculator and enter you noted in the step 3 and 4.
Step 6: Set the camera to Manual mode.
Step 7: Set the Shutter Speed calculated by the HDR Exposure Calculator. Then, take the first bracketing.
Step 8. Change the camera setting to Auto Exposure Bracketing (AEB) mode.
Step 9: Using the AEB options, set the Exposure Increment to +/- 2 EV or otherwise to the highest it supports.
Step 10: Select continuous shooting mode and take a series of shots.
Final Thoughts
Knowing that bracketing real estate is the must-use technology for photography. However, it only can reach to the highest value if you are using the right camera settings and real estate photo editing to enhance the beauty of listings.


