A Great Guideline Of Real Estate Photography Camera Settings
Photography is the art of arrangement and creativity of photographers. Creativity, sensibility, and good knowledge about photography create artworks. There isn’t a common formula to get a piece of art. But, any beginner photographer should always start with familiarizing photography terms and testing with the guideline of camera settings, which are essential background before reaching a level of professionalism and creativity.
In this post, we introduce a great guideline of Real Estate Photography Camera Settings and useful information to get perfect exposure.
Necessary Real Estate Photography Gears
Like taking a real shot, in the beginning, you also prepare necessary real estate photography gear. Here is the list of our recommendations:
Tripod – Refer to our list for the best tripod for real estate photography.
A wide lens (18-24mm)
A Flash
A Camera – Refer to our list for the best camera for real estate (Experts’ choice for 2021) or the best budget camera for beginners
Real Estate Photography Camera Settings
In this part, we walk you through some basic camera definitions and real estate photography camera settings. Continue reading and immersing in useful information!
Creating the nearly perfect exposure straight out of the camera is essential to have amazing real estate photos. After proceeding through the photo editing steps, you can turn your photos into a unique piece of art. However, leaning heavily on editing software makes potential home buyers easily lose their trust in the listing. Image enhancing is just a step to polish a jewel, which doesn’t aim at fixing something inherently broken. That’s why trying your best to get the right photos in the camera is very important. To do it, it is crucial to understand your camera and especially real estate photography camera settings.
Before jumping into the recommended real estate photography camera settings, let’s start with the common photography terms and definitions, which all beginner photographers need to understand
The Common Photography Terms And Definitions
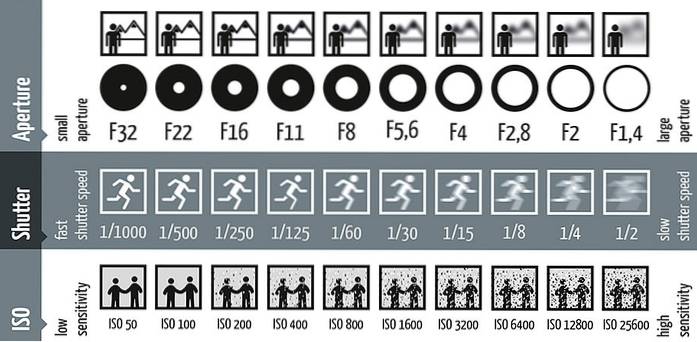
Aperture, shutter speed, and ISO are three main components to create exposure.
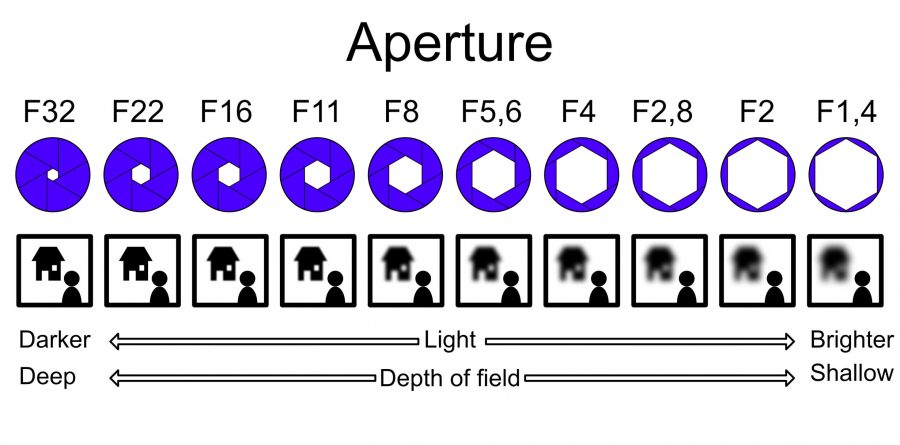
Aperture
Aperture is the size of the opening of the diaphragm in the lens. It is measured in f-stop and controls the amount of lighting going into the lens. The smaller the aperture value, the more light comes into the lens. Widening the aperture means selecting the smaller value. For example, the aperture of f2.8 allows more lights to strike the sensors.
The aperture term also refers to the depth of field. In reverse, the larger aperture value, more details compressed into a frame. So, setting an aperture is the balance between an adequate intake of lights and the depth of fields. In real estate photography, the aperture recommended is between f8-f11. Normally, f8 is mostly used.
ISO
ISO refers to the sensitivity of the camera’s sensor to the light. The higher the ISO amount, the greater sensitivity to light. However, try to keep ISO low as much as you can. Ideally, ISO ranges from 100-320 to minimize noise or grain in the exposure.
Shutter Speed
Shutter Speed is measured in seconds, which indicates the time the lens opened for the light to strike the sensor. In the low light condition, you should set the longest shutter speed. To deal with that condition, it is necessary to have a tripod to avoid the risk of blurring. Bear in mind that the longer shutter speed also creates variances in light and color or color cast. So, at that time, you will be flexible to adjust ISO and aperture manually.
As for beginner photographers, we recommend aperture priority mode. This mode allows you to manually set your ISO and aperture like 200 or 320 ISO and f 8.0, then leaving the camera to indicate the proper shutter speed matching with ISO & aperture.
White Balance
White Balance is important in both camera setting and post-production. The natural light has a temperature depending on the time of the day, geography. Light color is also affected by the color of the furniture, walls. They will strike altogether. The ideal solution to minimize the effect of colored lights is using the only light source or multiple sources of light with the same color temperature. You can also set White Balance to the color temperature of natural light and the other furniture color, and the wall looks like in the white light. The fact is that doing that takes so much time for real estate photographers. That’s why we recommend setting Auto White Balance then doing further editing in Photoshop.
Interior & Exterior Photography Camera Settings
- Exterior
- Image Quality (RAW)
- ISO 320
- f/8.0
- White Balance (Auto)
- Drive (2s Timer)
- Bracketing (3 frames, -1, 0, +1)
- Metering (Spot)
- Focal Length – Varies, but I shoot the longest possible
- Interior
- Image Quality (RAW)
- ISO 320
- f/8.0
- White Balance (Auto)
- Drive (Single Shot)
- Bracketing (7 frames, -3, -2, -1, 0, 1, 2. 3)
- Metering (Spot)
- Focal Length – Longest possible, and never wider than 22mm (35mm equivalent)
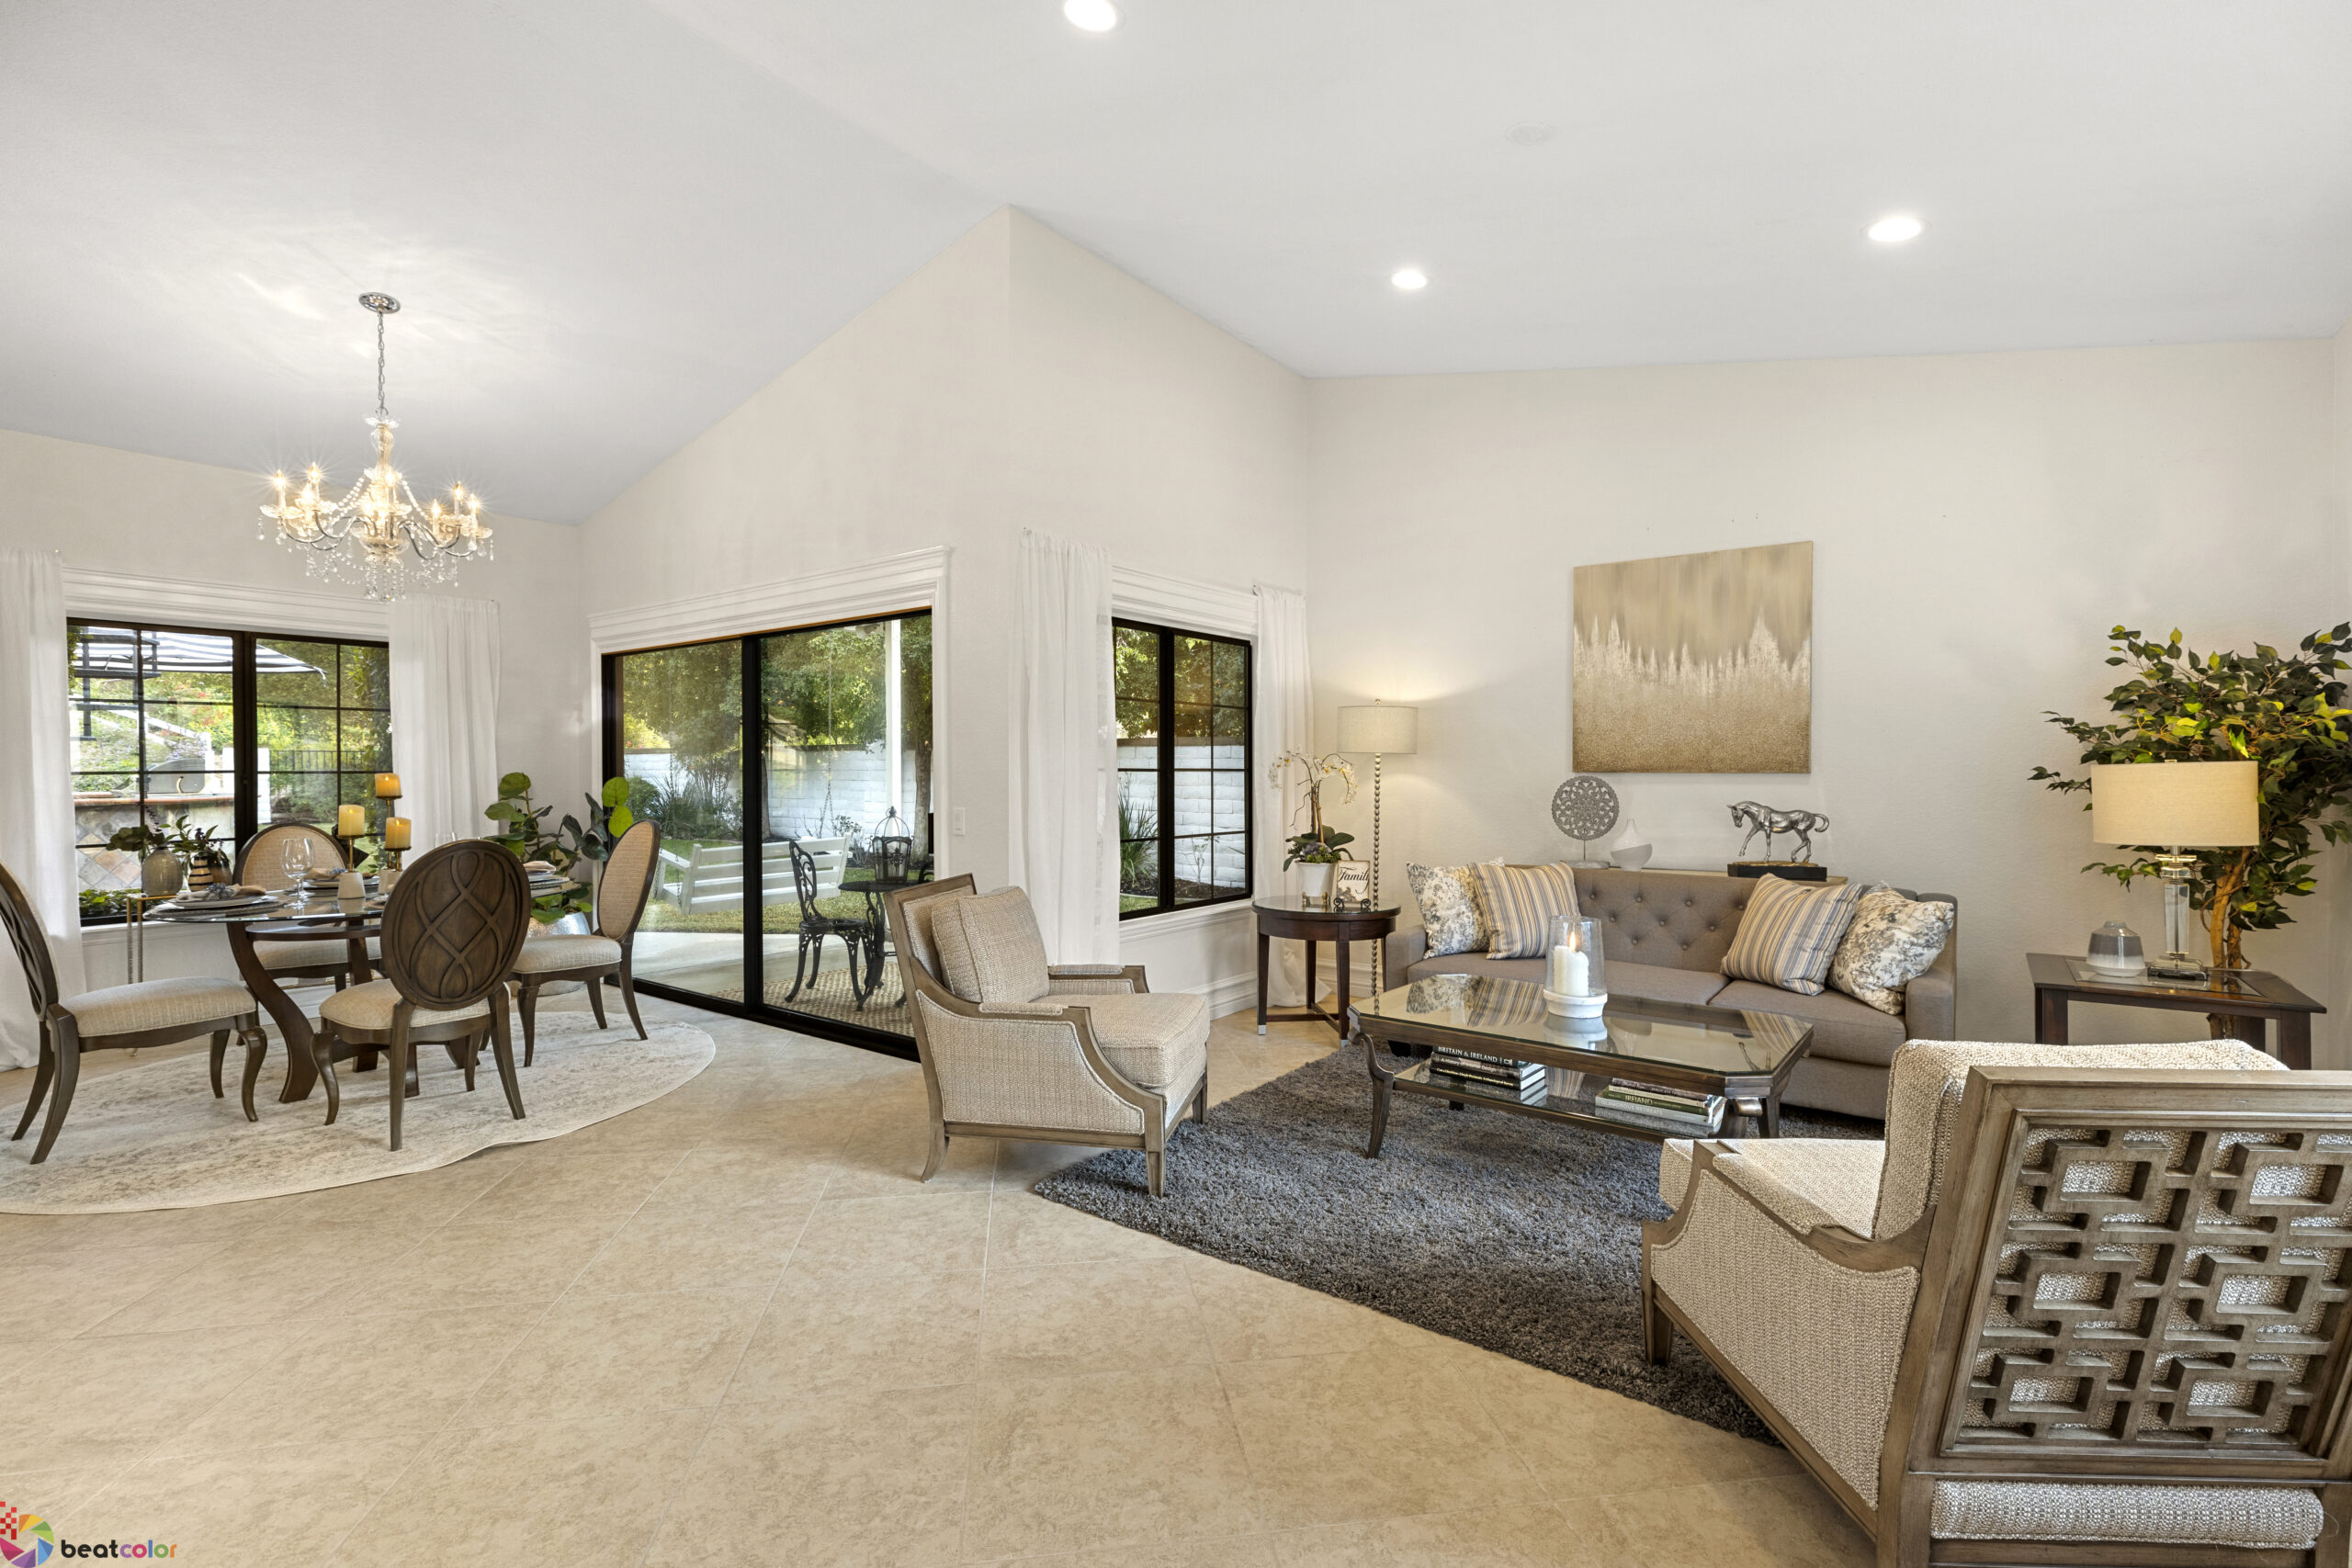
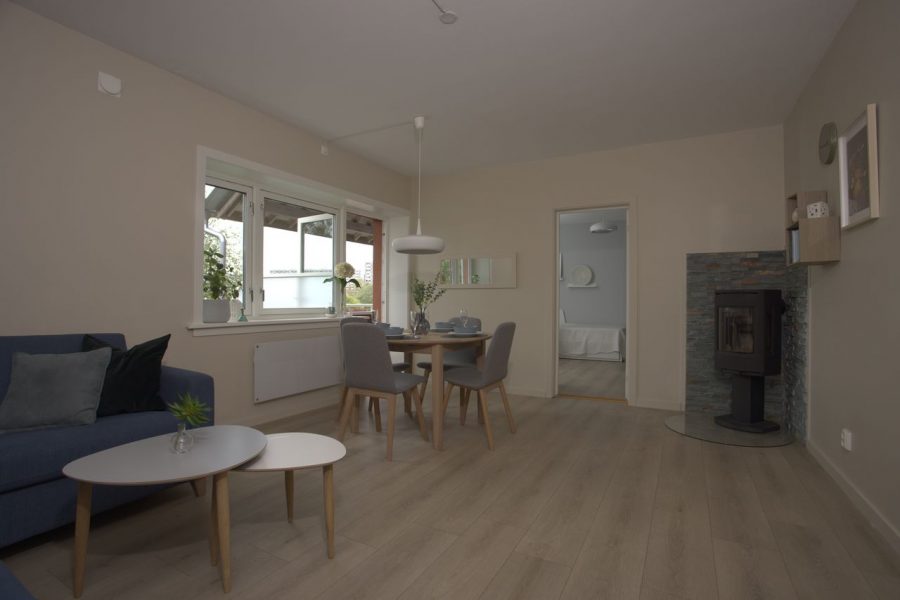
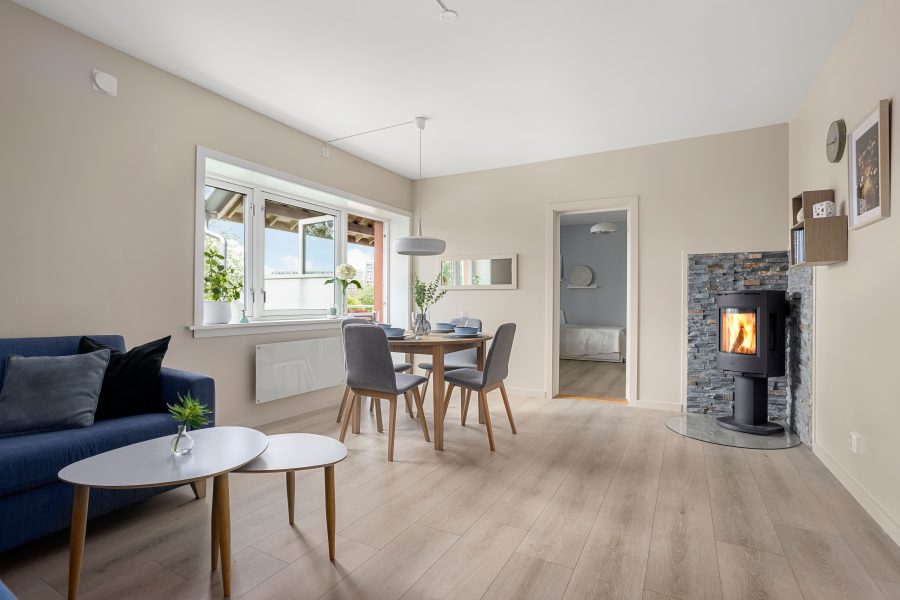
Apply Real Estate Photography Camera Settings Into Interior Shooting
Now, let’s practice and apply real estate photography camera settings to interior shooting. At the same time, don’t forget the following tips to get perfect real estate images!
- Open the blinds/ shades and curtains.
- Keep the height of the tripod around 4ft (1.2m), which is equivalent to the height of the waist-chest.
- Extending the tripod’s height at 5.5ft (1.5m) for the kitchen or any room with working surfaces.
- Take vertical shooting
- Put the tripod at the room’s corner to view 3 walls
- Use the timer function or a remote to take the photo in rooms where there is a risk of your reflection showing (like the bathroom)
- Take multiple photos
Used As The Main Layer In Photoshop
The Final Touches – Photo Editing Services
Getting good exposures lets you get 70% success. The remaining 30% depends on the photo editing process. Mastering photoshop software and skillfully editing photos even takes years to become a perfect shot. Outsourcing photo editing comes up as a wonderful solution to get everything easier and nicest!
BeatColor is one amazing Real estate photo editing company for you to put your trust in. They are A House Of Adobe Photoshop Experts. A strong team is dedicated to showcasing your listing outstandingly in the market. They offer high-quality photographic post-production for Photo Editing, Retouching, Virtual Staging, Video Editing, Slideshow.
To get started, let’s sign-up an account via https://clients.beatcolor.com/ and following the steps below to submit your project:
Step 1: Fill in the required information and email it to cs@beatcolor to activate your account.
Step 2: Login and Click the “Create” shown on the Dashboard. Complete the task information & tap on the “Next” button on the top right of the screen
Step 3: Drag and drop the files.
Step 4: Click on the “Request” to submit it successfully.
Step 5: Get a task done once receiving the notification email from the web.


