How To Blend Real Estate Photos In Photoshop – BeatColor Experts’Sharing

“How to blend real estate photos in photoshop” is always a hot topic that photographers, photo editors, and even realtors are interested in. Implementing editing techniques wisely and utilizing its tool correctly is vital to enhance color correction and consistency.
This great post provides you with a strong background in real estate photo editing software and step-by-step guidance on how to edit real estate photography. Now, let’s get started!
Real Estate Photo Editing Software Used For How To Blend Real Estate Photos In Photoshop
This first part introduces you to the main tools you use to edit real estate photos. Despite the new advent of real estate photo editing software, Adobe is still the experts’ choice for photo editing. Continue reading to understand what Adobe’s features are invented for you!
Adobe Photoshop
Over time, Adobe Photoshop has been the professional’s choice for image enhancement despite the new release of other real estate photo editing software and apps. Adobe remains the best for all-in-one photo tools. Its exceptional and various tools offer retouchers high versatility.
The skillful Adobe Photoshopper can manipulate real estate photos, making them more inviting. Properties will be presented in the way the home buyers would personally view them. Especially, Adobe photoshop experts, who use tools correctly, can show the house at best while adding an artistic style. It is vital as you have only 20 seconds to capture viewers’ attention.
Adobe Bridge
Referred to as the creative asset manager, the Adobe Bridge is a powerful tool for you to organize, preview, and add keywords, labels, etc. to your files. The most valuable feature of Adobe Bridge is compatibility with Adobe Photoshop.
This compatibility speeds up the real estate photo editing process and increases the convenience for editors. Specifically, you will experience:
- Import your digital photos using the Photo Downloader, which lets you rename files or convert them to DNG during import.
- Open your raw images for editing in Adobe Camera Raw directly from Bridge.
- Open photos right in Photoshop for targeted editing.
- Batch rename or batch export your photos with various size and scale options.
Camera Raw Plugin
Camera raw is an extension to Photoshop, in which you can proceed with basic editing before finishing touching-up images on Photoshop. The integration of Camera Raw significantly increases user convenience in batch processing, in which you can apply the same specifications to all relating exposures.
Realty editors can use Camera Raw to adjust images through brightness, contrast, white balance, lens correction, and chromatic abbreviation in real estate photography post-production.
Adobe Photoshop Tools For Real Estate Photo Editing
Lasso Tool (L): Selecting parts
Pen Tool (P): Giving users more controls to select parts. It can be curving according to the shape & form of the furniture.
Adjustment Layers: You can track differences between layers through the adjustment layers.
Curves Layer: Brightness level adjustment and add tint to it.
Hue and Saturation: Increase or decrease the saturation of the image.
Levels: Adjust the whites and blacks of the photo.
Step By Step Guideline On How To Blend Real Estate Photos In Photoshop
Step 1: Open Images In Bridge And Check Image Specification
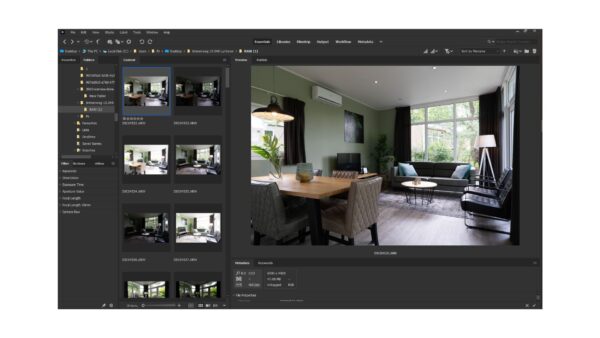
Step 2: Select The Most Suitable Exposures And Label Them
We will choose the best lighting exposure, another exposure capturing almost details in the shadow area well. We also need to select the exposure, which showcases nearly enough components in the blown-out area well. Finally, let’s get the one where the window view is the clearest.

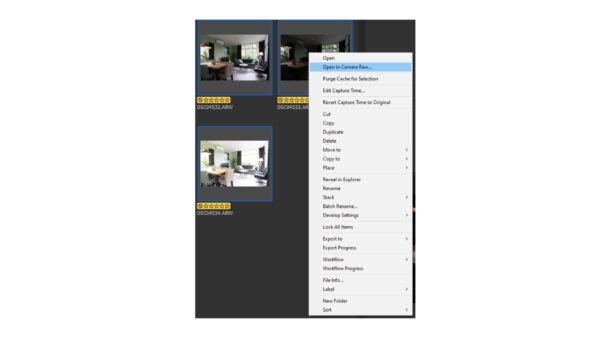
Step 3: Open All Shots Selected In Camera Raw And Edit Each
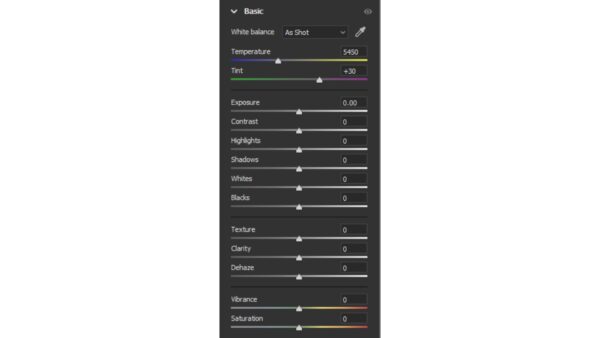
In this step, we work with basic sliders on Camera Raw. We adjust each slider by increasing or increasing the essential elements that make the photo closer to what we see in reality.
- White Balance: Make color balance like what we can see under the real lighting conditions at the time of the shooting.
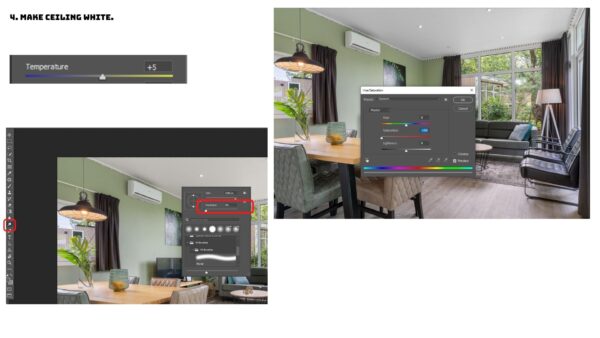
- Temperature: Fine-tunes the white balance to a custom color temperature. Set the color temperature using yellowish (warmth) or bluish color temperature.
- Tint: Make the color more green or more magenta. We normally utilize this control to fine-tune the colors after using the temperature control.
- Exposure: Adjust the brightness or darkness of an image.
- Contrast: Fine-tune brightness between the bright and dark areas in an image. The contrast makes the darks darker and your lights lighter,
- Highlight: Retake details in the overexposed area.
- Shadow: Regain details in the under-exposed area.
- Whites: Define the true white in an image
- Black: Define the black level in a snap.
- Texture:
- Clarity: This slider has the same function as the contrast. It, however, controls the photo’s middle tones.
- Dehaze: Reduce haze
- Vibrance: Increases the saturation of less-saturated colors more than the colors that are already saturated. Another understanding way is to change the saturation of all lower-saturated colors with less impact on the higher-saturated colors.
- Saturation: Saturation slider increases the intensity on all pixels in equal amounts. At the same time, it creates banding of colors and over-saturates skin tones.
Finally, remember to click “Remove Chromatic Abbreviation” applied to items in the photo which is so glaring. & “Use profile corrections.”
Step 4: Image enhancement in Photoshop
The fourth step involves the following
Merge lightning
Open all exposures you will use as the background, bright layer, dark layer, and window layer. Find the Window located in the Menu Bar. Click on it and scroll down to Channel. Next, hold Ctrl and Click Blue from Channel to take all over-exposure details.
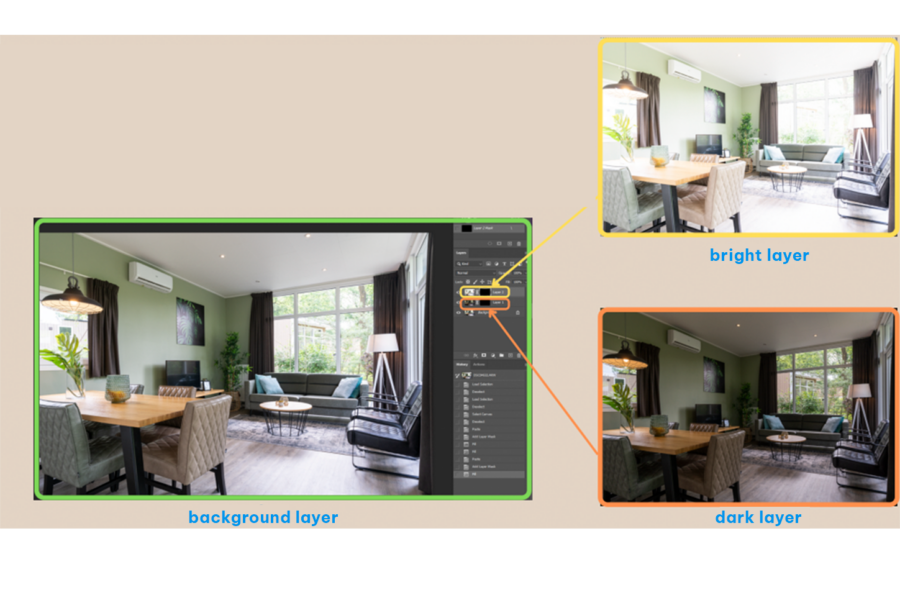
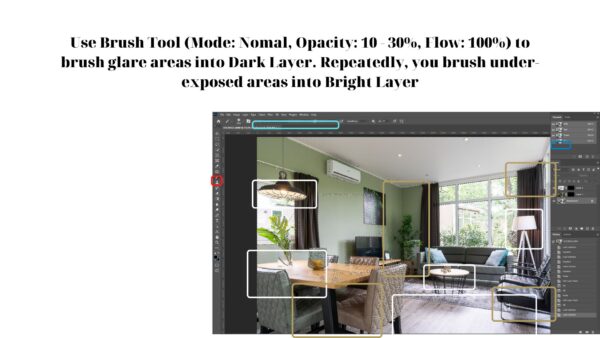
Use Brush Tool (Mode: Nomal, Opacity: 10 – 30%, Flow: 100%) to brush glare areas into Dark Layer. Repeatedly, you brush under-exposed areas into Bright Layer
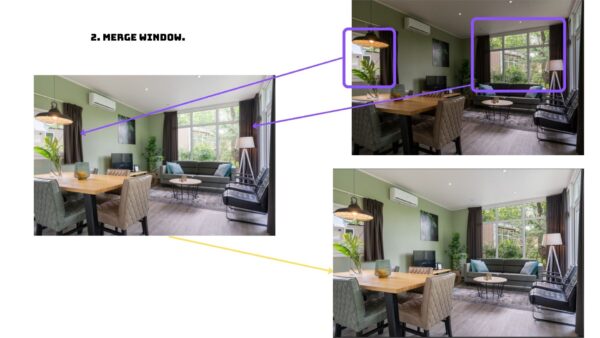
- Merge Window: Merge the window from the window layer into the background layer. Additionally, get a 10% area closest to the window view to make it look natural.
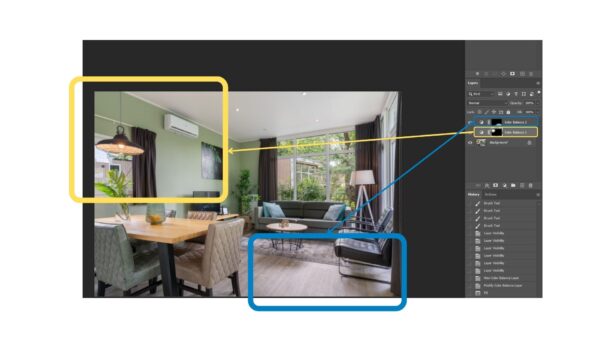
- Color Adjustment

- Make Ceiling White
- Review And Do Overall Adjustment
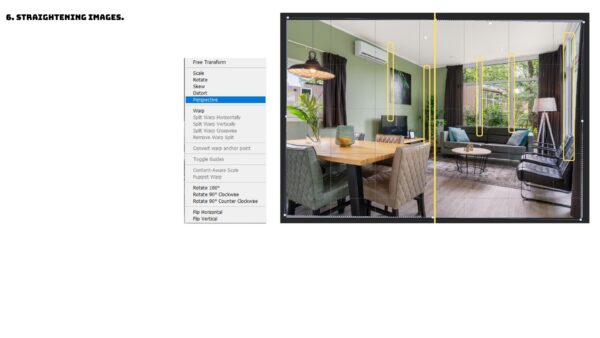
- Straightening
- Finishing The Editing Process: Sky replacement outside the window, add some contrast if necessary, add TV’s screen & add fire to the fireplace. Remove the camera and reflection of the photographer, sharpen, and erase the wires.
Wrapping Up
We hope this informative post gives you an insight into “How to blend real estate photos in Photoshop”. Although each editor has their editing method, the root techniques of editing are always vital to follow. Otherwise, you could fail to edit some parts of the photos. If you have any questions relating to the editing method, please feel free to leave us a message via cs@beatcolor.com.
Thank you for reading!
Related Posts:
- Bracketing Real Estate & Advanced Technique For Photographing Interior
- Real Estate Photo Editing Techniques to Improve Property Images
- How Real Estate Photo Retouching Shorten Your Home Selling Process?
- Common Real Estate Photo Editing Techniques
- Outsourcing Real Estate Photography Editing


