Professional Real Estate Photography Editing Techniques – Steps Explained To Follow

Mastering real estate photography editing techniques is just as important as photographing skills. In fact, editing techniques both enhance and make up for the limitations in the shooting process. Understand its utmost importance; in this article, let’s look through step by step how each technique works magic to your photos.
1. Real Estate Photography Editing Techniques: Flambient Photo Editing
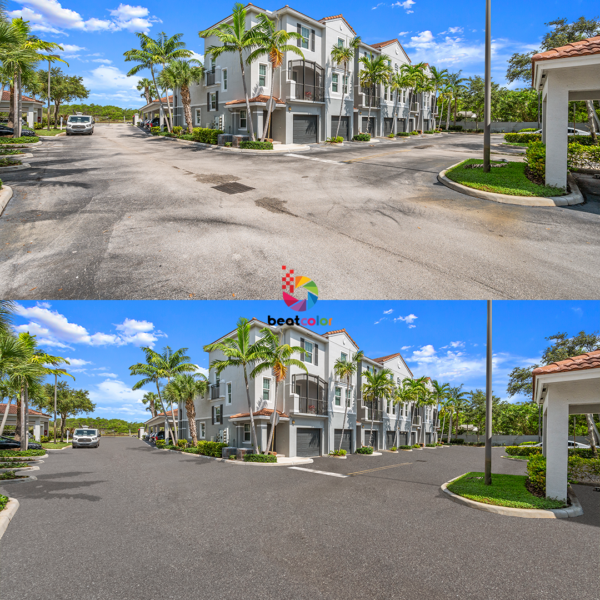
There are various methods of editing real estate photos, yet the two commonly used are HDR and Flambient blending. In our previous article, we have given a detailed guide on how to do HDR merging. This time, let’s take a closer look into how you can produce a flambient edited photo, where we can make the best use of flash and ambient shots.
Layer images as base and top photos
Basically, shooting in ambient light gives the most natural look to the final result, but the dark corners can still suffer from color lost. Here, flash shots help lighten the far-corner areas and also result in more shadow. The very first step is to balance them is to arrange the layer position. It’s important to make sure the flash layer is the base photo. Ambient images are on the top of flash images.
Recover the discoloration areas
The next step is to change the mode of the ambient layer to luminosity. The purpose of this is to hold off the exposure in ambient shot and allow only its color visible for editing. However, this will cause discoloration to some parts of the image because the luminosity mode also influences the flash shot under in.
To recover those areas, add a new layer and change its mode to color. Now you will use the Brush tool, select the color of nearby areas to paint on the color-lost parts. This step requires a little skill and attention to detail.
Window masking
If you have a separate shot just for masking the window view, it will be the best. Yet, in other cases, just make a mask for the window right from the ambient shot. For the final retouching, set the brush opacity to around 30% and brush through the parts that need recovery till everything looks finely blended. If you still struggling with the one, try looking through our sharing – Clipping Path vs. Masking: What Do You Know?
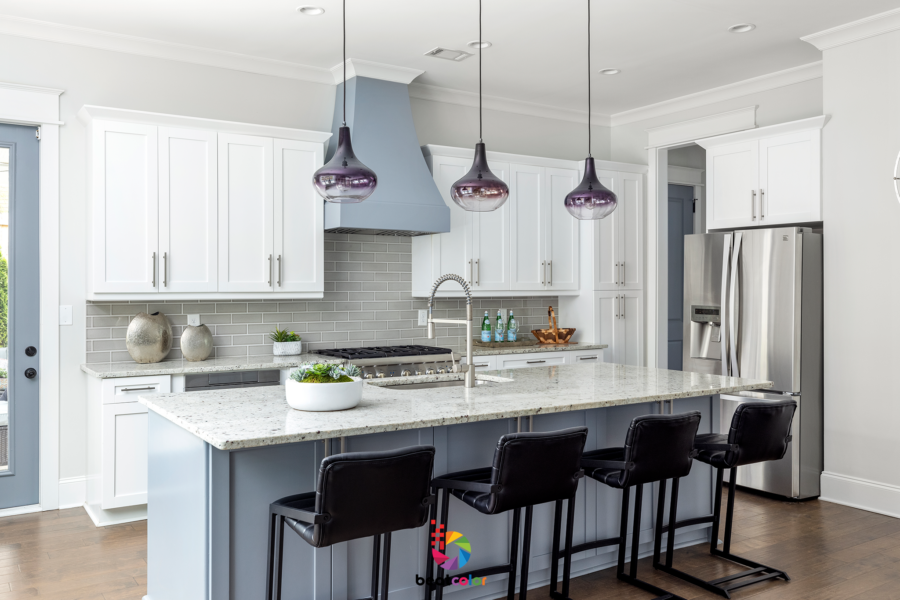
A flambient edited photo, where we can make the best use of flash and ambient shots.
2. Real Estate Photography Editing Techniques – Correcting Color and Brightness
Color correction is one of the most important one in real estate photography editing techniques. These real estate photo editing tips should make the white truly white, there are no more yellowish or reddish areas.
Edit the overall image tone in the camera raw
Camera Raw in Photoshop provides all the essential elements for you to create the most natural and close-to-reality look. Below are some factors you can freely adjust to have your own style.
- White Balance: Make the object appear at the same white level as what we can see in real-time conditions.
- Temperature: Allow users to increase the warmth (yellow) or coldness (bluish) to a custom color temperature.
- Tint: Add more green or magenta color. It provides more adjustment after using the temperature control.
Further remove color cast
The lighting environment influences and produces color cast on specific parts of images. That is why we need more real estate photo editing techniques. Hit Command J (MacBook) or Ctrl J (Windows) to duplicate the layer. Continue to adjust the hue/saturation or color balance until you get the correct color for the image. After you finish the adjustment process, just add a layer mask.
To get the correct color at specific parts of the images, you will need to use the selection tool. Pay attention to little details and select those parts. Go to select and modify the feather, choose the 1-pixel option, and command X to cut. For further guidance, you can find our previous article Photoshop Color Correcting Techniques In Real Estate Photo Editing.

3. Real Estate Photography Editing Techniques: Unwanted Item Removal
Not every property is clean looking with zero broken or stain but having it reshoot will be a waste of time and effort. In that case, removing items in Photoshop is one of the top crucial real estate photography editing techniques. Below are easy-to-follow steps using the Clone stamp tool in Photoshop:
- 1. Choose the clone stamp tool
- 2. Hit Alt and select the source area to replicate the sample
- 3. Clone over the unwanted object
- 4. Merge and further enhance to look natural
4. Real Estate Photography Editing Techniques: Vertical Alignment
Vertical alignment or perspective correction is another vital editing tip. The shape and structure of the house might look wrong or distorted if the alignment is off. First, you can utilize the automatic perspective correction in Camera Raw.
Select the Transform panel, where you can freely choose between five Upright modes. Each mode applies a correction to the photo as follows:
- Auto: enables an appropriate set of perspective corrections.
- Level: ensures that the image is level.
- Vertical: applies both level and vertical perspective corrections.
- Full: adjusts level, vertical, and horizontal perspective corrections.
- Guided: enables users to draw guides and make customed perspective correction.
5. Real Estate Photography Editing Techniques: Decrease Noise
Grain effects or noise issues can occur when the photos are shot in a weak light environment. The tiny dots appear as a side effect of increasing the light. It makes the images hazy and decreases the quality of final outputs. Fortunately, you can easily dehaze the images in Photoshop. The most easy to follow step is to navigate to filter and select noise and noise reduction. However, there is more to discuss and can be found here How to Reduce Noise in Your Real Estate Images.
6. Real Estate Photography Editing Techniques: View Replacement
One of the most commonly used real estate photography techniques is sky replacement. The first step is to make a mask for the currently existing sky. Then, add a layer containing a new sky. However, masking the sky requires a level of meticulousness. It gets challenging when dealing with tree branches and other fine details.
This is when the Shift Edge and Fade Edge sliders come to help. Shift Edge adjusts the border between the new sky background and the foreground. The fade edge increases or decreases the feathering between the two.
Final Thoughts
How to edit real estate photos is crucial and every photographer should learn those techniques. You can find them a bit difficult when starting but hopefully the step-by-step explanation above will help in the practicing process. However, if you ever need support from the true professional editors, you can always turn to BeatColor for quick and high-quality photo editing services.
Related Posts
How to Reduce Noise in Your Real Estate Images
Photoshop Color Correcting Techniques In Real Estate Photo Editing
Clipping Path vs. Masking: What Do You Know?
How To Blend Real Estate Photos In Photoshop – BeatColor Experts’Sharing


